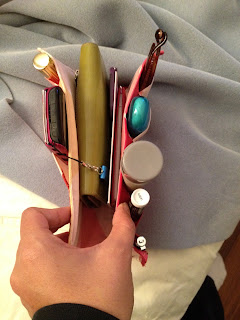
I really love when people ask me to make something. I feel like I am finally leaving the begginers table and being succesful. I mean, if you want me to make you something... that must mean you like what I make!
After my mom saw the messenger bag I made (see previous blog) she asked me to make her a purse organizer. It was the biggest compliment. She said, wow you made that, I think you could make me a thing Ive been wanting but havent found. I felt like a champ.
The first thing I did, as any DIY enthusiast I am sure, was to get online and start looking for ideas. There are a BUNCH!
Make sure that you draw on one of the right side of your squares of fabric where the sewing will go, which is the carton. Look closely on the next picture and you will see white lines. That is my indicator of where the sewing will go.
Then attach the two small peaces of fabric to the right side of one of your squares. The creases of the carton will help as a guide, put the small peace of fabric on the crease and there should be about an inch or less of space between the small piece of fabric and the edge of the carton.
Attach the two ends of the pieces of fabric only. Do not sew what you hemed.
After you attached the two ends then grab different items from your purse and pin them under the fabric. This was you will have enough room for each item. This is when the 3 extra inches will come in handy. There has to be enough room between the separations you will make in order to fit things like your cell phone of lotion.
After my mom saw the messenger bag I made (see previous blog) she asked me to make her a purse organizer. It was the biggest compliment. She said, wow you made that, I think you could make me a thing Ive been wanting but havent found. I felt like a champ.
The first thing I did, as any DIY enthusiast I am sure, was to get online and start looking for ideas. There are a BUNCH!
I showed them to my mom and non of them fit exactly so I used all the ideas and made this one:
Its easy and fun, it took me about an hour and a half, maybe less to finish.
All you need is:
- Fabric. I used about 2 squares 16" each. Depends on the size you want it.
- Cereal box. I actually used a pancake mix box.
- Sewing Machine.
First you need to cut your cereal box. I cut mine to about 9" x 10". You need to cut it in a way that you get the creases of one side of the box. in order to fold your purse organizer.
Then cut your fabric to two squares of the same size as your carton plus half an inch.
This is what you should end up with:
I made the squares a lot bigger than the carton and then just cut the excess after sewing.
After you cut (and iron) your squares cut two pieces of fabric of the width of your square plus 3" (very important to add at least three inches) and about 3.5" high. Then sew a hem for them. It will look something like this:
Make sure that you draw on one of the right side of your squares of fabric where the sewing will go, which is the carton. Look closely on the next picture and you will see white lines. That is my indicator of where the sewing will go.
Then attach the two small peaces of fabric to the right side of one of your squares. The creases of the carton will help as a guide, put the small peace of fabric on the crease and there should be about an inch or less of space between the small piece of fabric and the edge of the carton.
Attach the two ends of the pieces of fabric only. Do not sew what you hemed.
After you attached the two ends then grab different items from your purse and pin them under the fabric. This was you will have enough room for each item. This is when the 3 extra inches will come in handy. There has to be enough room between the separations you will make in order to fit things like your cell phone of lotion.
After you are done with the small pieces of fabric pin the other square of fabric and pin them right sides facing each other. Then sew the top the bottom and one side. Leave one side open.
Cut if you have excess and turn it around. Then introduce the carton and then sew (carefully) the opened end by folding the fabric. Also sew the rest of the edge of the carton for more security.
It will look something like this.
Then fold and introduce everything in there.
I was actually amazed of how it turned out. My mom had a small platic bag with all her stuff and it all fit in the organizer.
Plus when she wants to change purses its a lot easier.


